Steam Workshop - Easy Steamworks Integration
|
Unity Asset Store version v1.24 Description Screenshots Documentation Scripting Reference Unity Forum Unity Asset Store Powered by Steamworks.NET |
Description
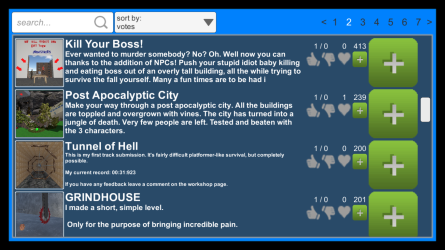
The Easy Steamworks Integration brings various Steam features to your game with a very few clicks. The Steam Workshop plugin allows to browse, vote, favorite, subscribe and upload user generated content. You can integrate this plugin within your uGUI menus or trigger a browse, upload or update popup with a single line of code. The UI is highly customizable and can be adapted to the look of your game.Features:
- single prefab drag n' drop for static UI
- single code line for popup UI
- highly customizable uGUI prefabs
- search items
- sort items
- subscribe and download items
- vote items
- add favorite items
- upload items (create or update)
- make and upload screenshots with defined resolution
Screenshots

click to zoom |

click to zoom |

click to zoom |

click to zoom |
Documentation
Getting Started
Link App And Setup Workshop
Show Independent Popups
Add To Existing uGUI
Scripting Reference
After importing the Unity package the browse example (in ExampleScenesPopup or ExampleScenesStatic folders) will work out of the box - Steam must be running.
By default Steamworks.NET will use the Steam AppId 480 - SpaceWar, use it for your Workshop browser integration tests.
However, it is not possible to upload new levels to SpaceWar.
Please follow the instructions in Link App And Setup Workshop to browse the Workshop of your game and to use the upload feature.
Link App And Setup Workshop
Follow the steps below to set the AppId and to configure Steam Workshop for your game.
- Start one of the test scenes to generate the steam_appid.txt file in the root of your project (the folder where Assets, Library and ProjectSettings directories a located).
- Open the steam_appid.txt file and replace 480 with your Steam AppId.
- Restart Unity Editor to load your new AppId.
- Login to partner.steamgames.com and open your game's App Admin page.
- Under Technical Tools hit Edit Steamworks Settings.
- Go to Application->Steam Cloud and set your data quotas e.g. 1048576000 for data per user and 1000 for number of files.
- [optional] Tick Enable cloud support for developers only to hide your Workshop work until it is finished for public use.
- Go to Workshop->General and tick Enable ISteamUGC for file transfer.
- Go to Publish and apply your changes.
- Steam might need a few hours for the changes to be applied -> be patient if it doesn't start to work instantly.
- Now you should be able to browse the items of your game's Workshop and to upload new items by using the provided example scenes (in the ExampleScenesPopup or ExampleScenesStatic folders). You can find a more detailed tutorial in the Steam partner portal.
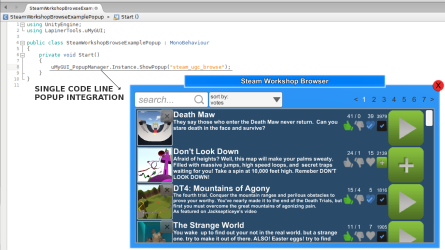
The single code line below will show a Workshop browser popup, which will list all comunity items of your game and allow to search, sort, vote, favorite, subscribe and download them. Please find detailed example code in addition with some other useful hints in the SteamWorkshopBrowseExamplePopup class.
// show the Steam Workshop browse popup
uMyGUI_PopupManager.Instance.ShowPopup("steam_ugc_browse");
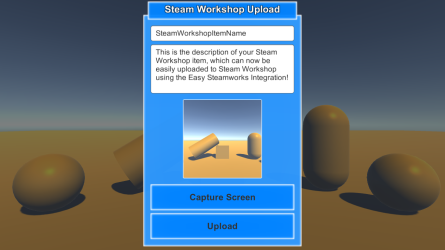
The code below will show a Workshop item upload popup, which will allow entering the name and description of the item. Besides, it will allow to make a screenshot, which will be displayed as the item icon in the Workshop. Please find detailed example code in addition with some other useful hints in the SteamWorkshopUploadNewItemExamplePopup class.
// tell which folder you want to upload
WorkshopItemUpdate createNewItemUsingGivenFolder = new WorkshopItemUpdate();

createNewItemUsingGivenFolder.ContentPath = ...;
// show the Steam Workshop item upload popup
((SteamWorkshopPopupUpload)uMyGUI_PopupManager.Instance.ShowPopup("steam_ugc_upload"))

   .UploadUI.SetItemData(createNewItemUsingGivenFolder);
The following code shows a Workshop item update popup, which allows updating the name, the description and the icon of an existing item. All changed files in the given folder will be updated or uploaded. Please find detailed example code in addition with some other useful hints in the SteamWorkshopUpdateOwnedItemExamplePopup and SteamWorkshopUpdateItemFromFolderExamplePopup classes.
// load item data from existing item folder
WorkshopItemUpdate itemUpdate = SteamWorkshopMain.Instance.GetItemUpdateFromFolder(...);
// show the Steam Workshop item update popup
((SteamWorkshopPopupUpload)uMyGUI_PopupManager.Instance.ShowPopup("steam_ugc_upload"))

   .UploadUI.SetItemData(itemUpdate);
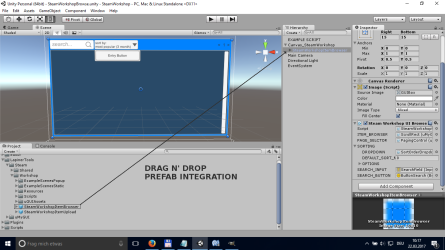
Add To Existing uGUIYou will find two prefabs included in the package, SteamWorkshopItemBrowser and SteamWorkshopItemUpload. All you need to do is simply drag n' drop those into your Canvas or add them to any of your UI elements.
Powered by Steamworks.NET
The Easy Steamworks Integration series are powered by Steamworks.NET created by Riley Labrecquea. If you are lucky enough to earn some money with your game, then please consider a donation to Riley Labrecquea here.


