Snowboard Game Starter Pack (Template)
|
Description Screenshots Documentation Unity Forum (Support, Wishlist) Unity Asset Store |
Description
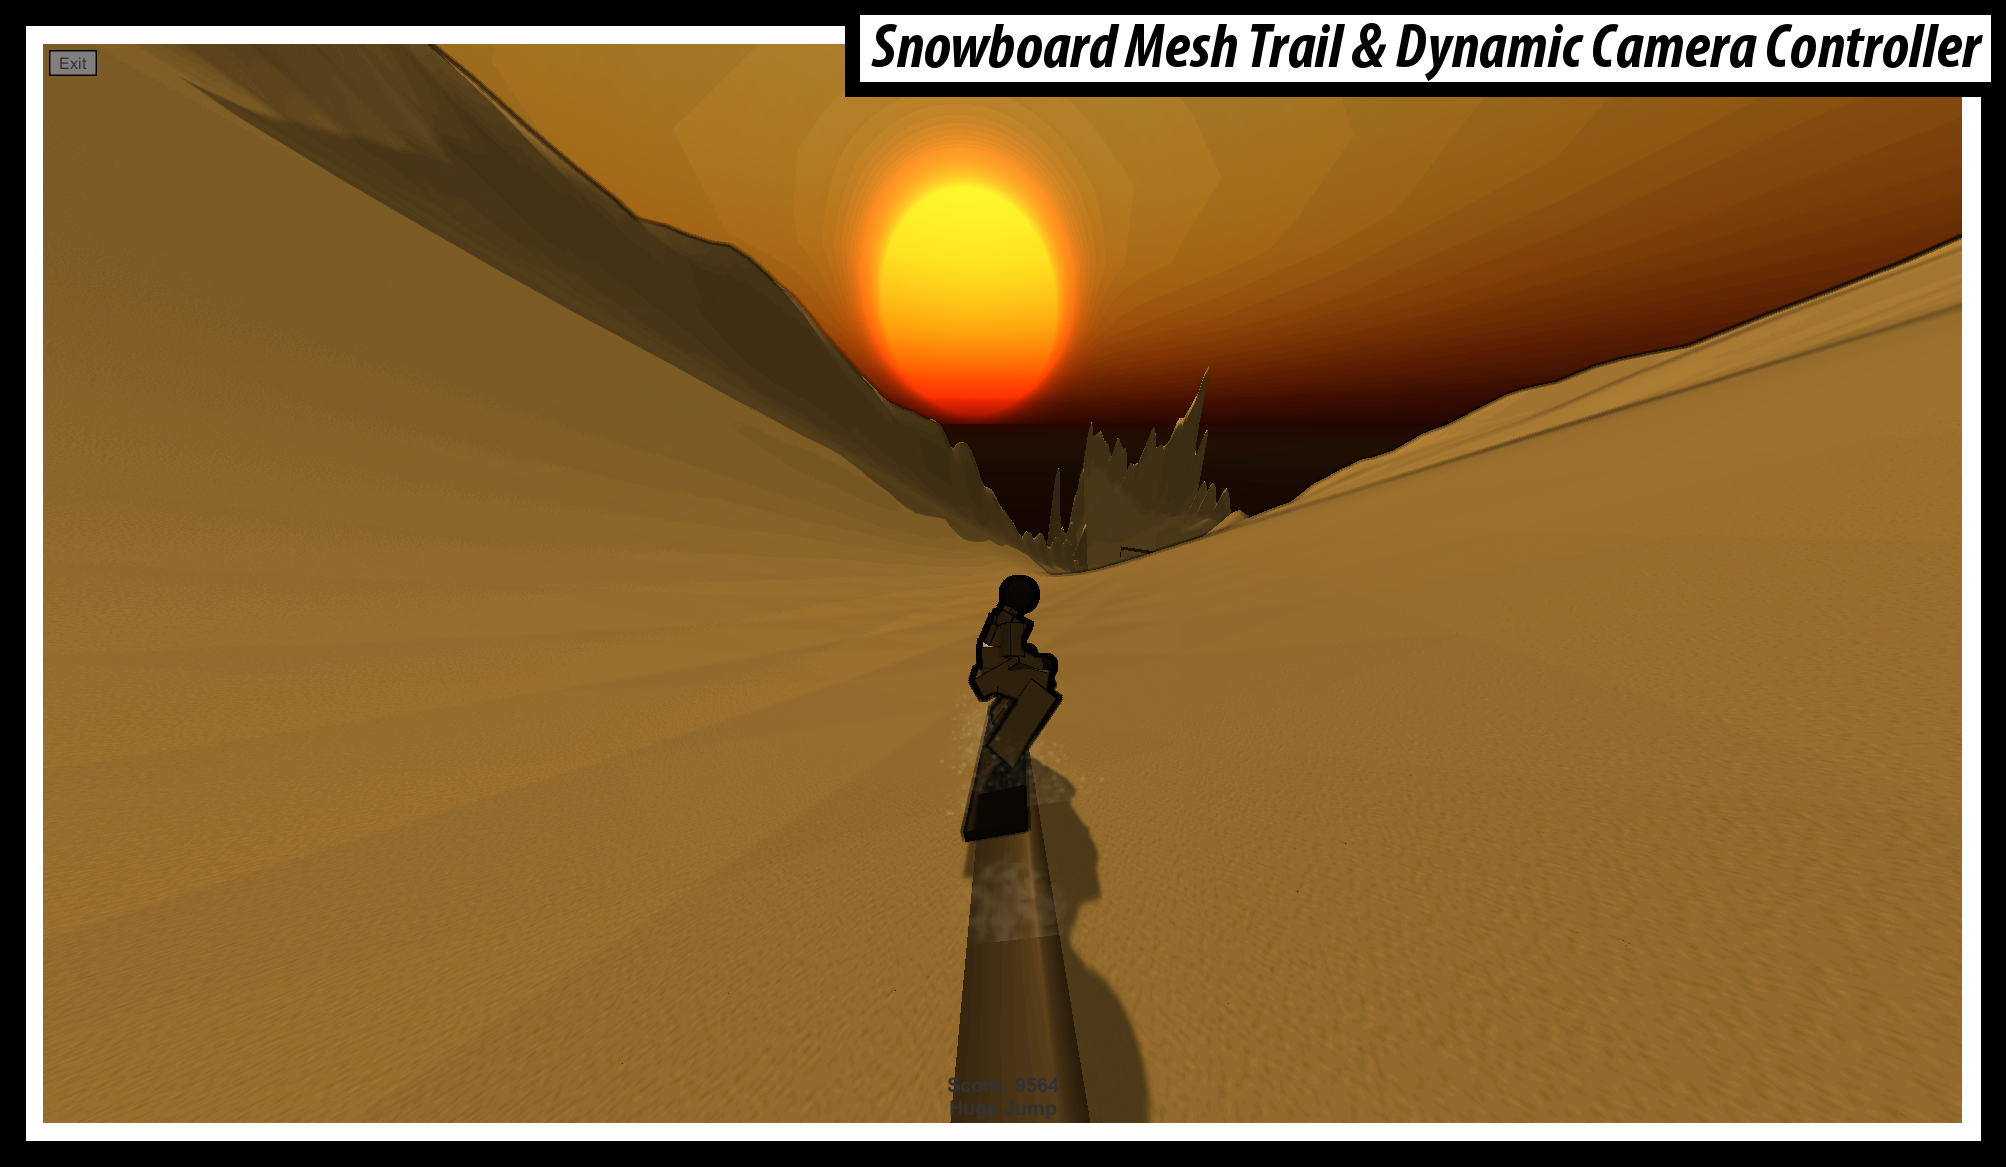
Give your snowboard game a head start with this game starter package. The content listed below describes the most important parts, which will help you to create your snowy adventure.- Universal Render Pipeline with post effects
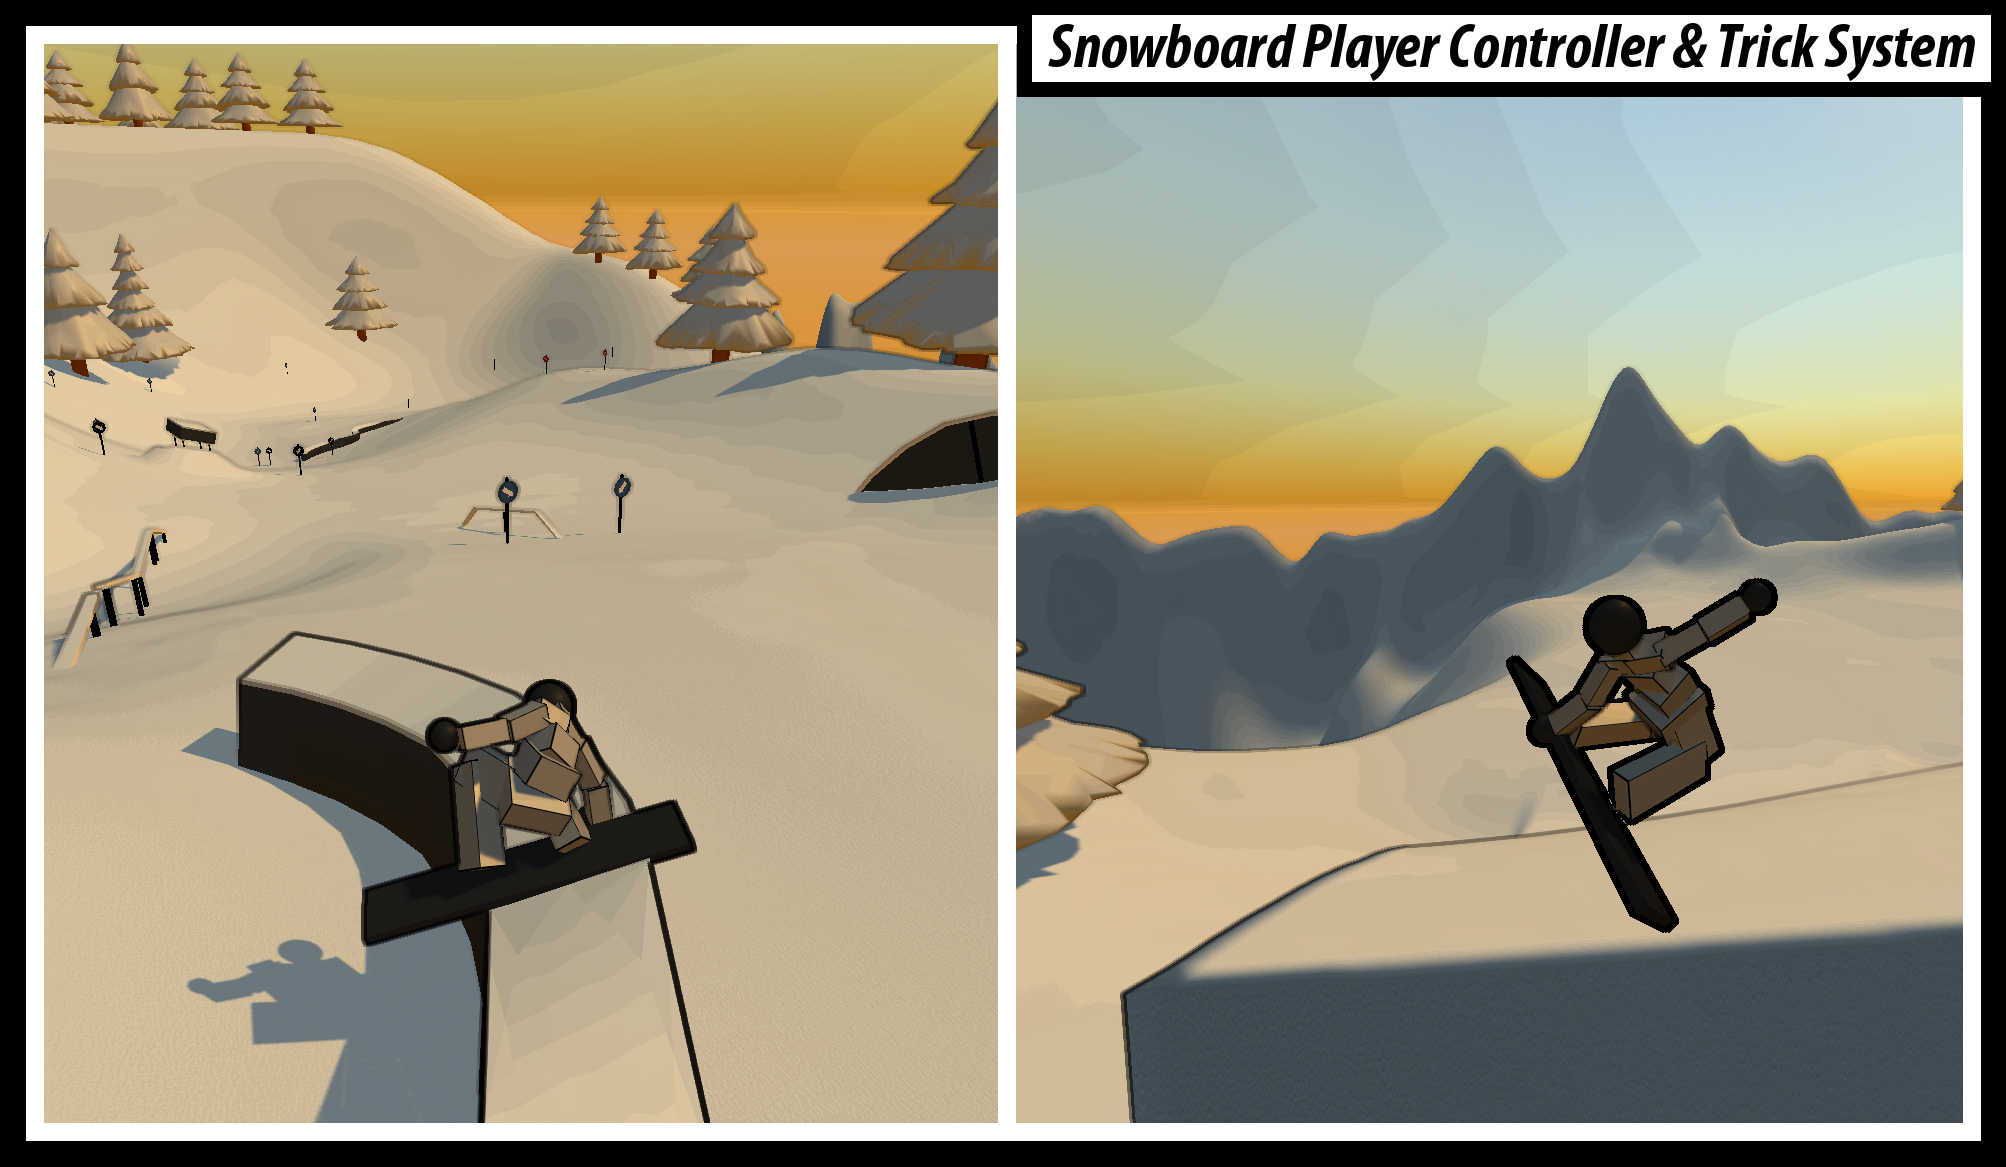
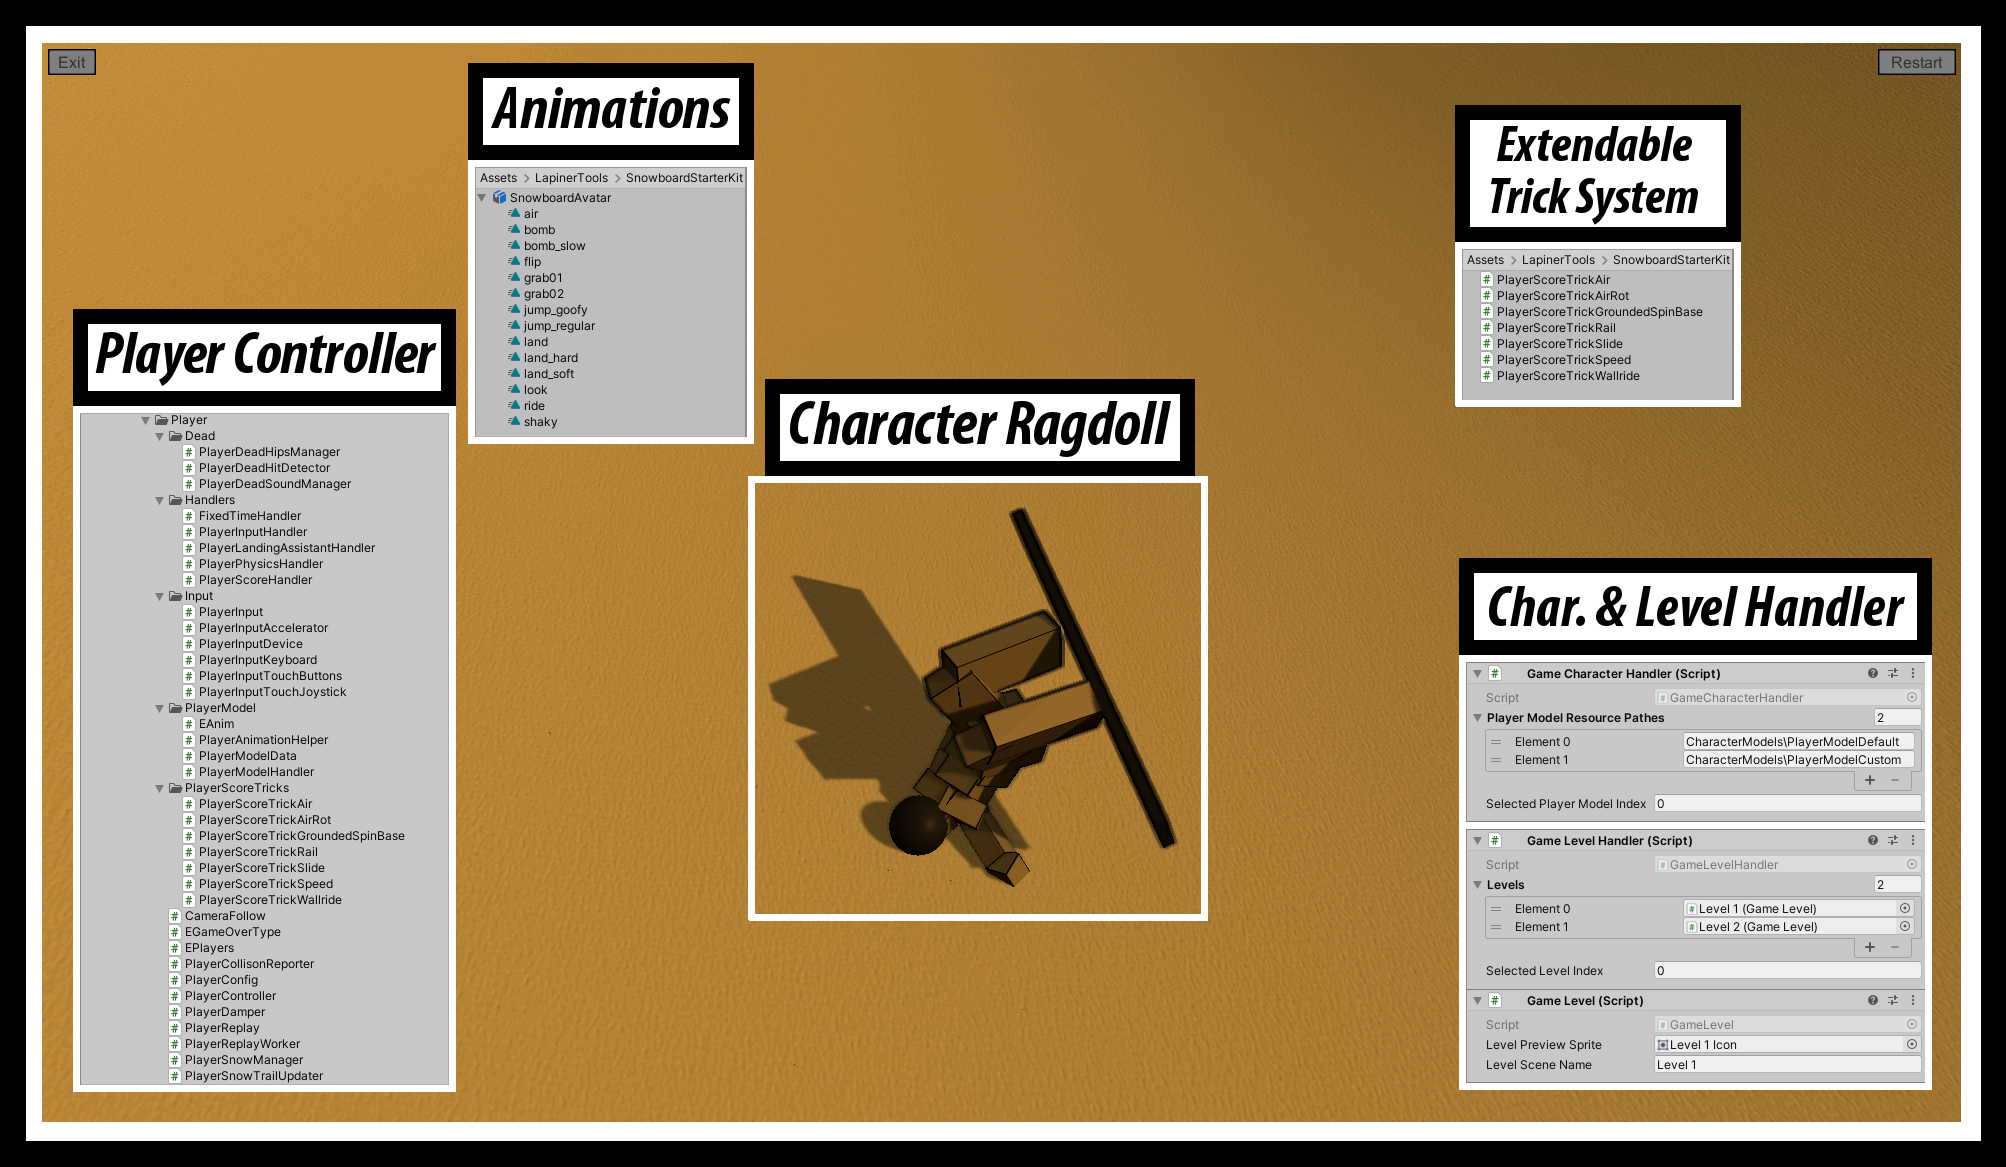
- Snowboard Player Controller
- Snowboard Dynamic Camera Controller
- Extendable Snowboard Trick System
- Snowboard Animations
- Snowboard Mesh Trail Renderer
- Snowboard Character Ragdoll
- Character Selection Screen
- Level Selection Screen
- PC Only (so far - mobile support is planned)
Screenshots

click to zoom |
click to zoom |
click to zoom |
click to zoom |
Documentation
Getting Started
Player Configuration
Control Configuration
Quality Configuration
Database Handler
Configure Level Selection
Configure Player Character Selection
Configure Rails & Slide Obstacles
Scripting Entry Points
To get started open the Menu scene in LapinerTools\SnowboardStarterKit\Scenes\ and hit run. You will see the menu loaded with a character and a level selection. Hit 'GO' in the middle of the screen and use the following default controls
- ride left / spint in air left: LeftArrow or A
- ride right / spin in air right: RightArrow or S
- accelerate / spin in air forward: UpArrow or W
- slow down / spin in air back: DownArrow or S
- jump: Space
- grab: V
Player Configuration
| The PlayerConfig prefab in the LapinerTools\SnowboardStarterKit\Resources\Configs\ folder allows you to modify various values of the player controller. |

|
Control Configuration
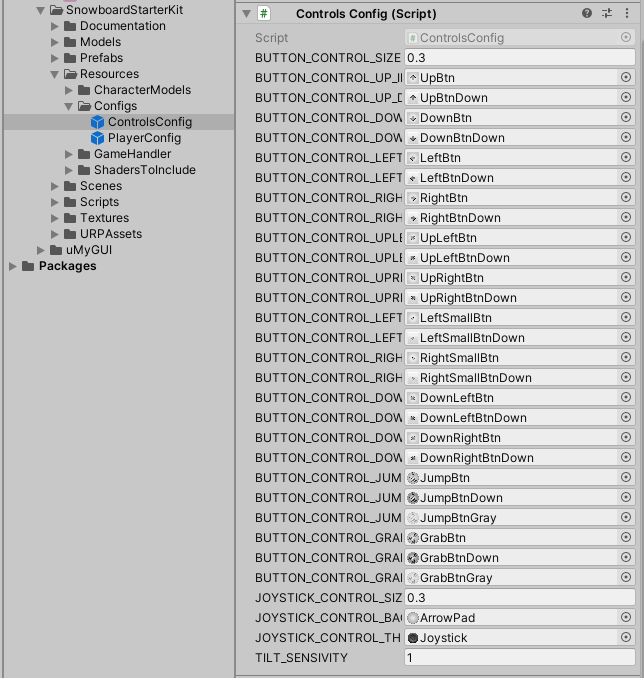
Use the ControlsConfig prefab in the LapinerTools\SnowboardStarterKit\Resources\Configs\ folder to modify the mobile (Android, iOS, Tizen) control UI and size.
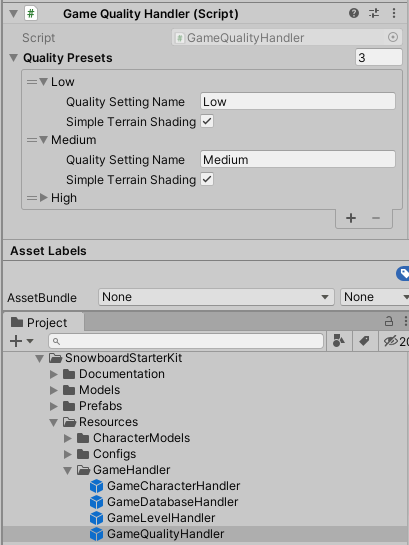
Quality Configuration
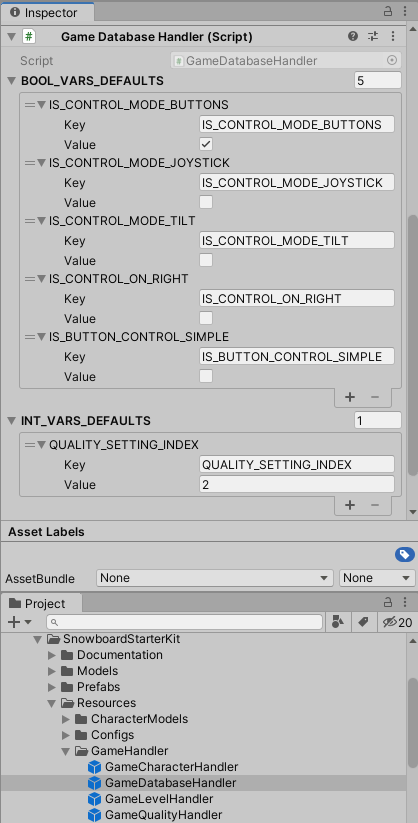
Database Handler
Configure Level Selection
|
To add a new level follow the steps below: |
|
|
1.a. Create New Level From Duplicate - Easy 1.a.1 Duplicate an existing level scene, e.g. Level 1 in the LapinerTools\SnowboardStarterKit\Scenes\ folder 1.a.2 Reshape the terrain and create new or rearrange/delete existing gameobject. Keep Camera and UILevel as is and move PlayerAlive to the new starting position 1.b Create New Level From Scratch - Advanced 1.b.1 Create a scene with a terrain 1.b.2 Delete the camera in your scene 1.b.3 Add the following prefabs from the LapinerTools\SnowboardStarterKit\Prefabs\ folder to the scene PlayerAlive, Camera, FinishLine and UILevel 1.b.4 Move the instance of PlayerAlive to the starting position 1.b.5 Select the Camera instance and assign the PlayerAlive instance to the Target property of CameraFollow class 1.b.6 Assign the terrain of the scene to the Terrain layer 1.b.7 Move the finish line to the level end position |
|
|
2. Add your new scene to the level selection in the main menu 2.1 Select the GameLevelHandler prefab in the LapinerTools\SnowboardStarterKit\Resources\GameHandler\ folder and open it for editing 2.2 Select the 'Level X' child with the highest number, then duplicate and rename it 2.3 Assign the 'LevelSceneName' and the 'LevelPreviewSprite' in the inspector of the newly created level 2.4 Add the duplicated child to the Levels array of the GameLevelHandler class on the root of the prefab 2.5 Add your new scene to File->Build Settings...->Scenes In Build |
|
|
3. Open the Menu scene and see your level added to the level selection |
Configure Player Character Selection
1. Create New Character Model
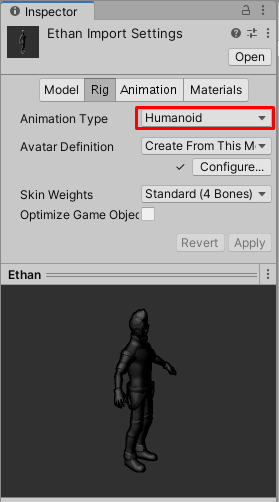
1.1 Make sure your character's Rig is compatible with Mecanim and configured as a Humanoid
1.2 Drag and drop your character into a new screen and add the PlayerModelData script
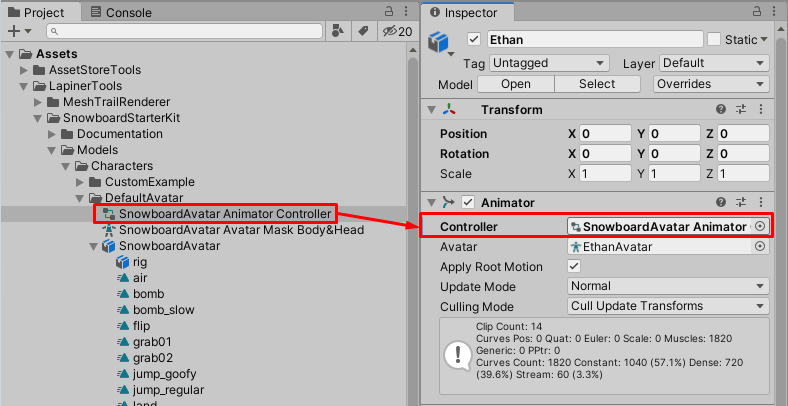
1.3 Assign LapinerTools\SnowboardStarterKit\Models\Characters\DefaultAvatar\SnowboardAvatar Animator Controller to the property Controller of the Animator component
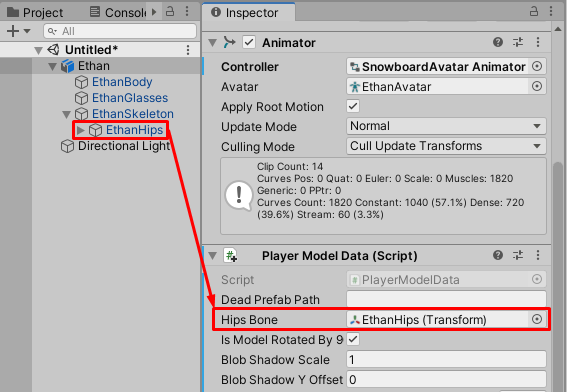
1.4 Assign the hips bone transform of your character to the Hips Bone property of the PlayerModelData component
1.5 Save you character as a new prefab in the LapinerTools\SnowboardStarterKit\Resources\CharacterModels\ folder
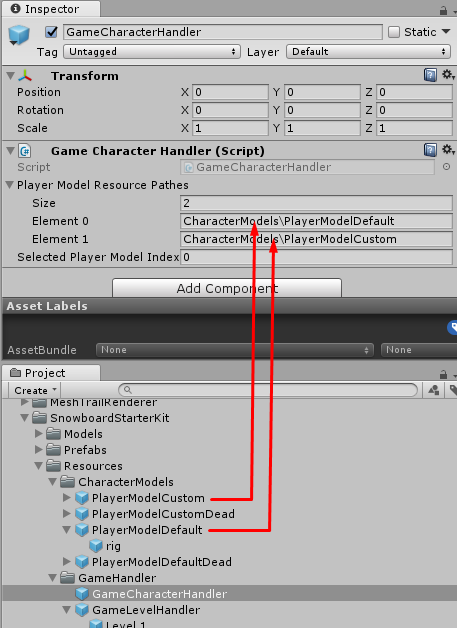
1.6 Add the Resource Path of your new character prefab to the Player Model Resource Pathes property of the GameCharacterHandler prefab in the LapinerTools\SnowboardStarterKit\Resources\GameHandler\ folder
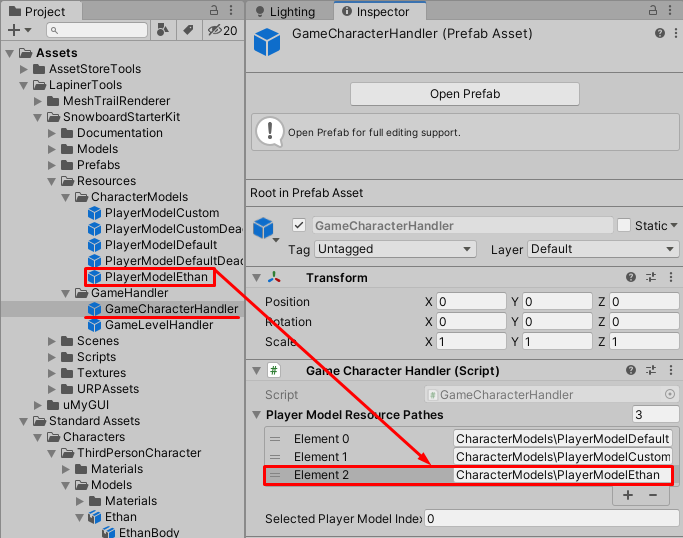
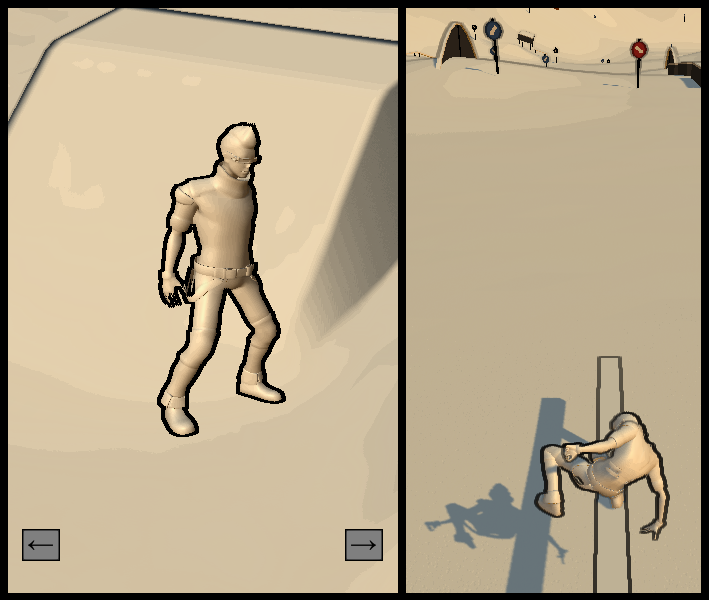
1.7 Open the Menu scene and see your new character added to the player model selection, start the game and check if animations work correctly
2. Add a snowboard, a trail and particle systems
2.1 Open your new character model for editing
2.2 Navigate to the the left lower leg bone of your character and attach the SnowboardTrailAndParticles prefab from the LapinerTools\SnowboardStarterKit\Resources\CharacterModels folder
2.3 Attach your snowboard model to the foot bone and make sure that it has no collider
(trail and particles don't need the foot bone rotation, but the snowboard mesh needs to be attached to the foot)
2.4 Adjust transformation of both added prefabs to roughly match the right position
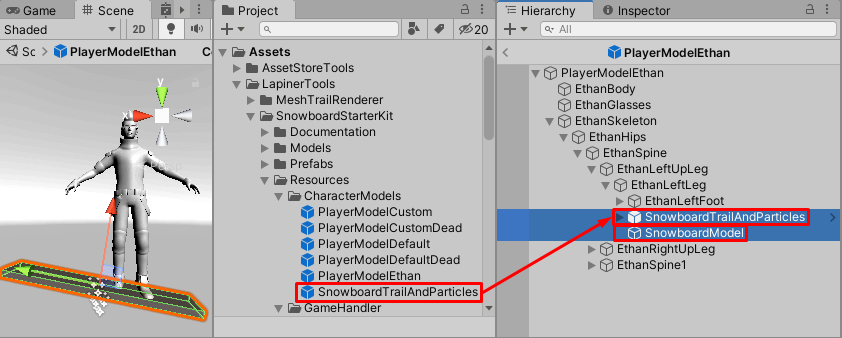
2.5 Open and start the Menu scene, then select your character in the menu and find the newly added prefabs in the hierarchy
2.6 Make final adjustments to the SnowboardTrailAndParticles and your snowboard prefabs, then copy the transforms and apply the updated values to the new character prefab
2.7 Assign the deactivated collider of the SnowboardTrailAndParticles prefab to the Additional Collider On Death property - this way the collider will be activated when the ragdoll is activated
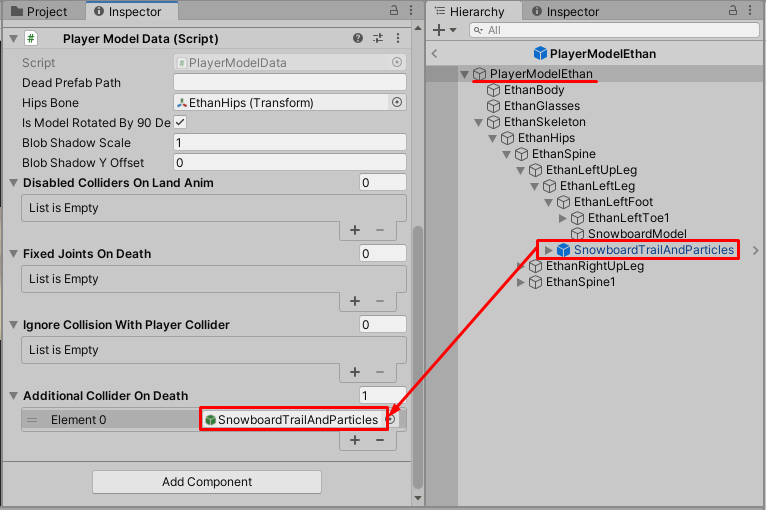
3. Setup Ragdoll
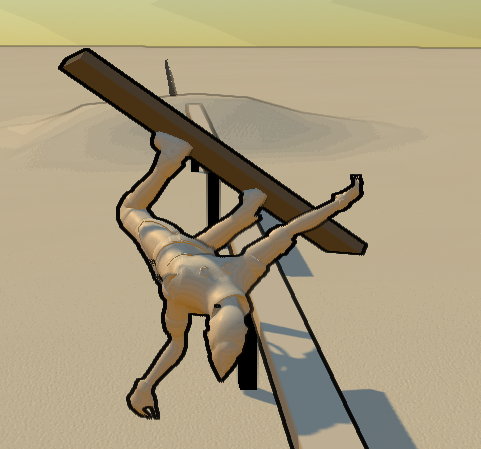
For all characters you will find a prefab with 'Dead' added to the name. This is a copy of the character, but only containing the rig. It will not be instantiated, but all colliders and joints will be copied to the character instance once the player loses control and the ragdoll is activated. Basically, the 'Dead' prefab describes how the ragdoll of your character behaves.
3.1 Duplicate your newly created character prefab and add 'Dead' in the end, then open it for editing
3.2 Remove all child gameobjects (e.g. snowboard model, trail, particle systems) except the bones aka the rig and the character model with the SkinnedMeshRenderer component
3.3 Remove all components (e.g. Animator) from root and children except the PlayerModelData and SkinnedMeshRenderer components
3.4 Open the Unity Ragdoll menu in the top bar GameObject->3D Objects->Radoll... - see Unity doc
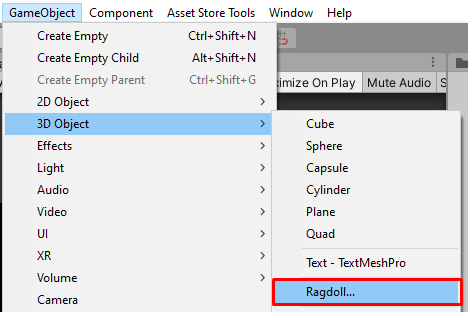
3.5 Assign all bones as requested and set Total Mass to around 75kg
3.6 Tick Flip Forward if the bones are not aligned to have their Z direction facing forward
3.7 Hit Create when done
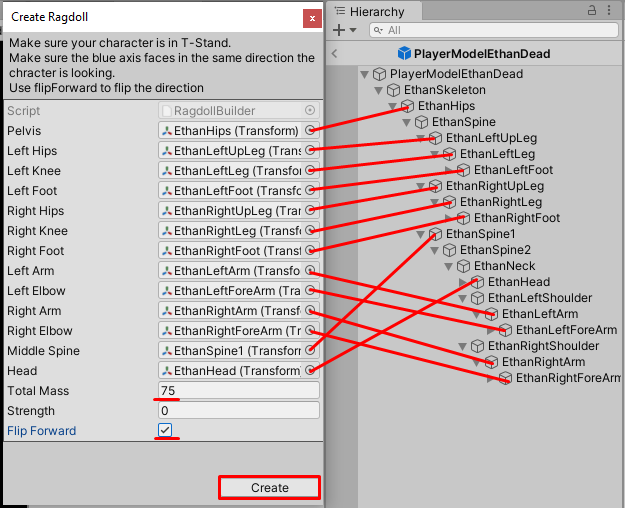
3.8 Adjust the created colliders to match your character visuals
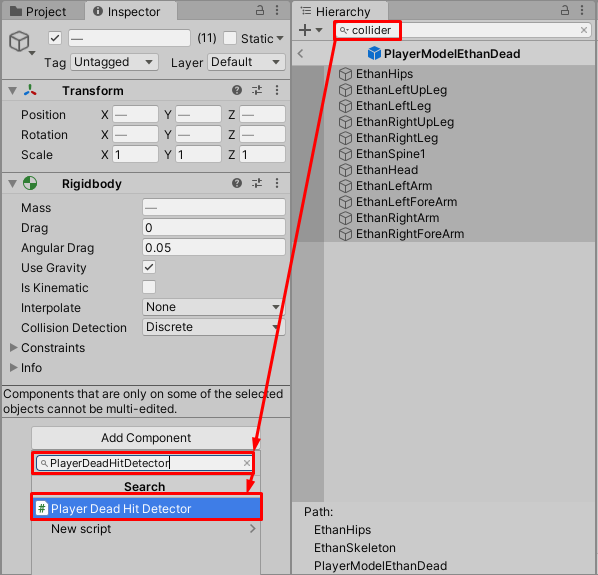
3.9 Search for all colliders in your character ragdoll and add the PlayerDeadHitDetector component
3.10 Now remove the character model gameobject and SkinnedMeshRenderer component
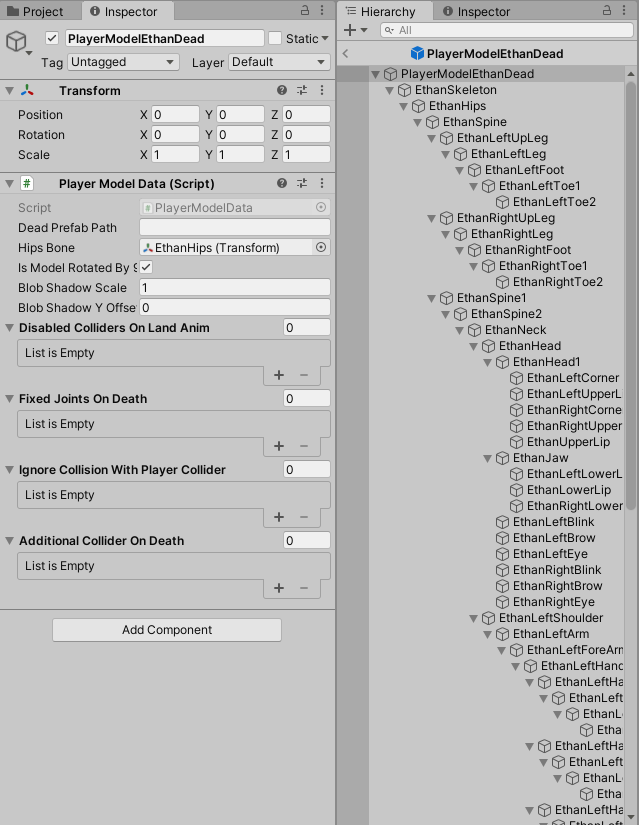
3.11 Clear list properties in the PlayerModelData component
You should now have only the PlayerModelData script on the root and the bone hierarchy with ragdoll Rigidbodies, Colliders and Joints
3.12 Add the PlayerDeadSoundManager component to the root and setup your sounds - it will also add an AudioSource component, which you can setup
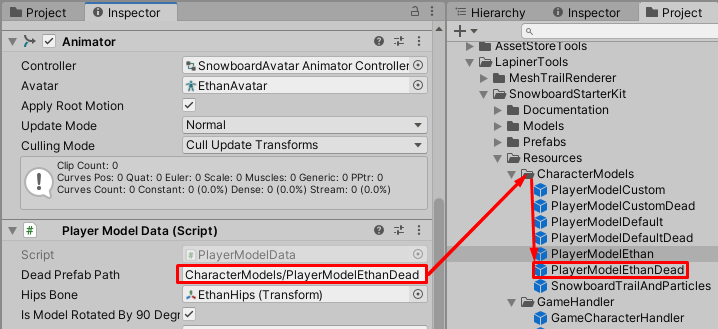
3.13 Enter the resource path of your 'Dead' prefab in the PlayerModelData property of the actual new character prefab
3.14 Start the game and kill your character, by e.g. jumping and holding 'V' for grab - the game over camera and popups should now be triggered
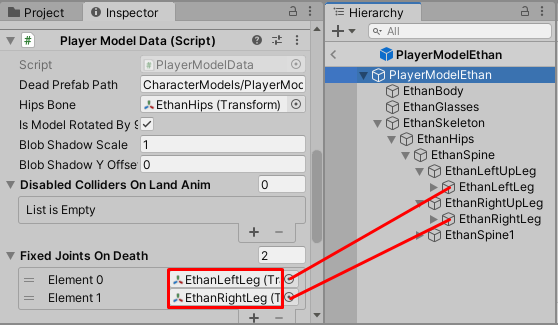
3.15 The only thing missing is that the right foot of the ragdoll is not attached to the snowboard, to fix that open your actual player character prefab for editing and assign the lower leg bones to the FixedJointOnDeath property of the PlayerModelData
Configure Rails & Slide Obstacles
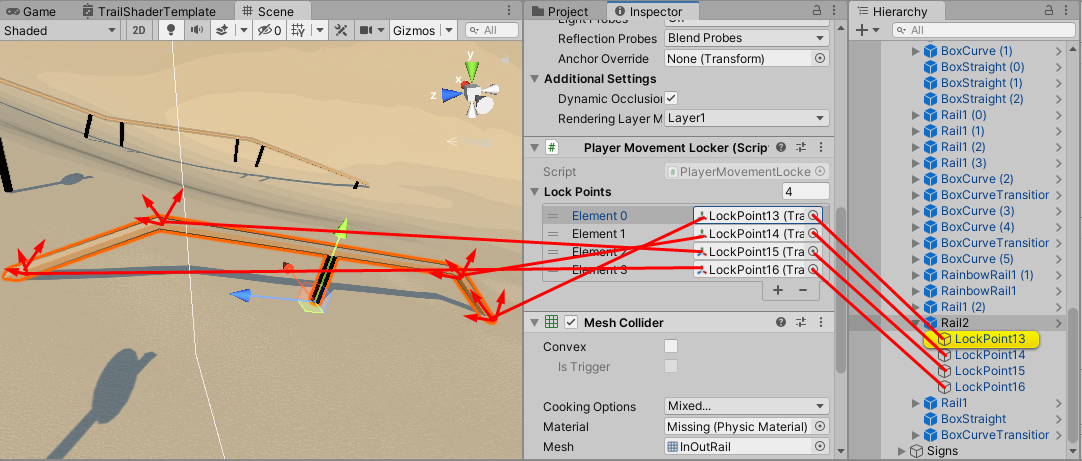
To create a rail add the PlayerMovementLocker script to the gameobject with the collider component of the obstacle. Then create transforms, which will be the points on the rail/obstacle, which the player will pass when grinding. Assign these transforms to the LockPoints property of the added PlayerMovementLocker component.
Scripting Entry Points
- PlayerConfig class: contains various balancing values. Adjust them to fit the player character balancing to your world
- UILevel class: shows the score UI and controls the Exit and Restart buttons. Adjust it to change your game handling, e.g. triggering a scoreboard
- UIMenu class: shows the level and character selection and controls the GO button. Adjust it to change your menu handling, e.g. show additional level data or options
- LevelEndSurface class: ends the level when the collider of the gameobject is touched by the player. Add you final score calculation or other game end events
- PlayerInput* classes: responsible for the player controlling. Add joystick handling or hook 3rd party plugins like Rewired here
Snow Mesh Trail Renderer Documentation
The snowy trail drawn on the terrain is created by another of my tools, the documentation can be found below.
Snow Mesh Trail Renderer


